What is Lockout Tagout, OSHA Requirements, and How It Works
By R.W. Hurst, Editor
By R.W. Hurst, Editor
Our customized live online or in‑person group training can be delivered to your staff at your location.
Lockout tagout (LOTO) is a federally mandated procedure for isolating hazardous energy before maintenance. Required under OSHA 29 CFR 1910.147, it prevents accidental startup and protects workers from arc flash, electrical shock, and serious injury.
Before any maintenance begins on equipment that could harm a worker through unexpected startup or stored energy release, lockout tagout requires that every energy source be physically isolated and secured by the worker performing the task. That worker holds the only key. No supervisor, no colleague, and no production pressure can override that control until the work is done and the worker removes their own lock.
OSHA 29 CFR 1910.147 has required this since 1989. It still generates more than 50,000 injuries and 120 fatalities per year in the United States when violated. It consistently ranks among the top 10 most-cited OSHA standards for a reason: the principle is simple; the implementation is not.
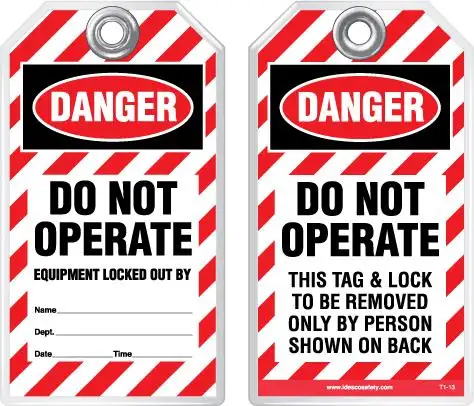
The two terms are not interchangeable. A lockout uses a physical lock on an energy-isolating device, such as a circuit breaker, valve, or disconnect switch. The device cannot be operated while the lock is in place. Tagout uses a warning tag on a device that cannot accept a lock, indicating that the equipment must not be operated. OSHA 1910.147 requires lockout wherever the equipment design allows it. Tagout is only permitted when locking is physically impossible.
Tagout is the weaker control. When a tagout-only program is necessary, OSHA requires compensating measures: removing an isolating circuit element, blocking a controlling switch, or opening an extra circuit. These steps must be documented and verified. A tag is not a lock. It cannot physically prevent re-energization. Workers and supervisors who treat tagout as equivalent to lockout are operating on an assumption that OSHA does not share.

The standard requires employers to develop and document an energy control program, provide energy-isolating devices that can be locked out, conduct annual inspections of each energy control procedure by an authorized employee, and train all authorized and affected employees. Each inspection must be certified in writing with the equipment name, date, and inspector. Each procedure must be reviewed with each authorized employee it covers.
Authorized employee: performs the lockout or tagout and holds the key. Must be trained in hazard recognition and the specific procedure for each piece of equipment they service.
Affected employee: operates or works near equipment that is being locked or tagged out. Must understand that they cannot attempt to restart or operate equipment under lockout or tagout under any circumstances.
Other employee: works in an area where lockout tagout is in use. Must understand that locked or tagged equipment cannot be operated or re-energized.
Lockout tagout covers all forms of hazardous energy, not only electrical. Each type must be identified in the written procedure and controlled with a specific isolation method before work begins.
Electrical: de-energize and lock out circuit breakers, disconnects, or fused switches. Mechanical: block, pin, or restrain rotating shafts, flywheels, coiled springs, and counterweights. Hydraulic: block cylinders and bleed system pressure to zero. Pneumatic: close supply valves, bleed lines, and block residual pressure. Thermal: close supply valves and allow heated components to cool before entry. Gravitational: block or lower suspended loads and raised machine members before workers enter the zone. Chemical: close and blank supply lines, purge, and test the atmosphere.
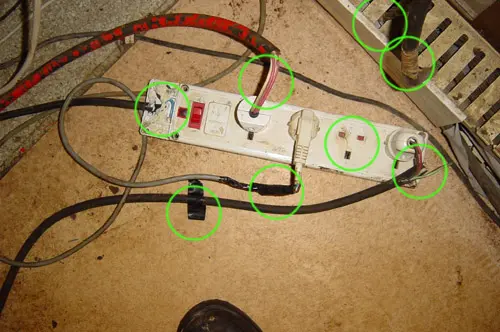
The most common field failure is thermal and hydraulic stored energy. Workers isolate the electrical source, assume the job is done, and fail to bleed down hydraulic lines or to allow heated components to cool to a safe temperature. Stored energy incidents account for a disproportionate share of LOTO injuries.
OSHA requires that each energy control procedure be equipment-specific and documented, covering everything from initial shutdown through final restoration, with each authorized employee removing their own lock only after verifying the area is clear. For the full step-by-step walkthrough, see Lockout Tagout Procedure – OSHA Safety & NFPA 70E Compliance.
Restoration reverses the isolation sequence. Each authorized employee removes their own lock after verifying that tools and personnel are clear and affected employees have been notified. Removing another worker's lock is a violation of the standard, regardless of the reason given.
Written procedures: one per piece of equipment where unexpected energization could cause injury. Generic procedures are not acceptable unless the employer can demonstrate that all covered equipment is similar enough that a single procedure provides equivalent protection. Each procedure must be specific enough to follow without additional instruction.
Annual inspections: required by OSHA 1910.147(c)(6) at least once every 12 months. Performed by an authorized employee other than the one who uses the procedure. Must include a review with each authorized employee covered by it. Must be certified in writing. In practice, inspections should verify that the written procedure still matches the current equipment configuration. A modified machine invalidates a procedure that was accurate when written.
Group lockout: when more than one authorized employee services the same equipment, each worker applies their own personal lock to a hasp. The equipment cannot be re-energized until every worker has removed their lock. Designating one employee to apply a single lock on behalf of the crew violates the personal lock requirement and is a common audit finding.
Think you know Arc Flash? Take our quick, interactive quiz and test your knowledge in minutes.
Contractors: the host employer must inform contractors about the on-site LOTO program and any unique hazards. The contractor must share their program. Where both run simultaneously, procedures must be coordinated. The host employer remains responsible for verifying that protection is in place for everyone on site.
No written program: assuming a generic procedure covers all equipment. Equipment-specific procedures are missing, resulting in a single procedure being used across machines with different energy sources. Annual inspections were not conducted: treating the requirement as administrative rather than operational. Stored energy not addressed: failing to bleed lines, discharge capacitors, or block suspended loads. Improper verification: relying on indicator lights instead of direct voltage testing at the point of isolation. Tagout is used when lockout is feasible: applying tags is faster.
OSHA 1910.147 governs energy control across all industries. NFPA 70E specifically governs electrical safety in the workplace. Under NFPA 70E, establishing an electrically safe work condition before any electrical task is the first requirement. That sequence is the electrical application of OSHA 1910.147: identify all electrical supply sources, interrupt the load current, open the energy-isolating device, visually verify it is open, release or restrain stored electrical energy, apply LOTO devices, and test with a rated-voltage tester to verify the absence of voltage. For a full explanation of what NFPA 70E requires on energized electrical work, see NFPA 70E Arc Flash Requirements For OSHA Electrical Safety.
Organizations that train their workforce in both LOTO and NFPA 70E together, rather than treating them as separate programs, consistently achieve better compliance results and fewer incidents.
OSHA 1910.147(c)(7) requires training for authorized employees, affected employees, and any other employees who work in areas where LOTO is used. Retraining is required when job assignments change, when inspections reveal procedural gaps, or when there is reason to believe an employee lacks the required knowledge or skills. OSHA Lockout Tagout Training - Electrical Safety Course covers all three employee classifications, energy control procedures, stored energy identification, and verification methods in a 6-hour live online or in-person course.
Facilities that need to qualify their full maintenance and operations workforce can access group training, live online delivery, and customized program development through Electrical Safety Training – NFPA 70E and CSA Z462 Courses.
CSA Z460, the Control of Hazardous Energy standard, parallels OSHA 1910.147 in structure and intent. It requires written procedures, equipment-specific energy control programs, training for authorized and affected workers, and annual program audits. Provincial occupational health and safety legislation references CSA Z460 as the applicable standard in most jurisdictions. Employers operating across the Canada-US border must address the requirements of both standards.
Explore 50+ live, expert-led electrical training courses –