How to Bend Conduit
By William Conklin, Technical Editor
By William Conklin, Technical Editor

Use a hand bender to mark, align, and bend EMT conduit precisely. Apply steady pressure for clean 90°, offset, or saddle bends. This ensures proper routing and code compliance in electrical installations.
Use a hand bender to mark, align, and bend EMT conduit precisely. Apply steady pressure for clean 90°, offset, or saddle bends. This ensures proper routing and code compliance in electrical installations.
Using the right tools and techniques, you can achieve precise bends—including 90-degree angles, offsets, and saddles—to navigate obstacles and fit conduit into tight spaces. This guide walks you through the process and key considerations to help you master the art of bending conduit effectively.
When learning how to bend conduit, understanding the techniques for making precise bends is essential. A 90-degree bend is one of the most common and useful for routing EMT conduit around corners or obstacles, requiring careful measurement and execution. Electricians must determine the stub height, the distance from the end of the conduit to the beginning of the bend, before aligning the bender. A 45-degree bend, by contrast, is useful for smoother transitions and changes in direction, especially when the conduit must rise or fall through narrow spaces. Measuring and marking carefully before you bend ensures accuracy, reduces waste, and improves installation efficiency.
Every craftsman knows that the right tools are essential. Your toolkit is an extension of your skill, allowing you to shape metal with precision and artistry. At its core lies the conduit bender, a tool as versatile as the electrician who wields it. For tackling rigid types like IMC, the hickey bender provides the leverage needed to conquer stubborn curves. Hand benders, with their compact design, are ideal for EMT and smaller sizes, allowing for quick and accurate bends in tight spaces. And when the job demands taming large-diameter pipes, the hydraulic tool steps in with its raw power.

Beyond the bender, precision is paramount. A sharp conduit cutter ensures clean cuts, the foundation of accurate work. Your tape measure meticulously marks bend points and calculates angles. A level ensures your runs are plumb and true, especially for vertical sections and offsets. A permanent marker clearly indicates points, while an angle finder verifies those critical angles. And finally, your fish tape or pull wire stands ready to thread conductors through your flawlessly shaped conduit.
Every tradesperson knows that the right tools make the job easier—and more professional. When it comes to bending conduit, your essential toolkit includes:
Hand bender: Best for EMT (½", ¾", 1") and marked for precision
Hickey bender: Useful for rigid conduit like IMC
Hydraulic bender: Used for large-diameter conduit and tight-radius work
Conduit cutter: Produces clean, square cuts to ensure bend accuracy
Measuring tape: For locating bend points and calculating spacing
Permanent marker: To clearly mark bend locations
Level and angle finder: Verifies vertical and horizontal alignment
Fish tape or pull wire: Helps guide conductors through finished conduit runs
Understanding take-up is critical. This is the length of conduit “used up” by a 90° bend and must be subtracted from your total length when marking the bend point.
| EMT Size | Take-Up Length |
|---|---|
| ½-inch | 5 inches |
| ¾-inch | 6 inches |
| 1-inch | 8 inches |
For example, if you want an 18-inch stub using ½-inch EMT, mark the conduit at 13 inches (18 - 5 = 13) before bending.
When creating offset bends to go around obstacles, you use a pair of equal bends—commonly at 10°, 22.5°, 30°, or 45°. Spacing is calculated using the offset height and a multiplier:
| Bend Angle | Multiplier |
|---|---|
| 10° | 6.0 |
| 22.5° | 2.6 |
| 30° | 2.0 |
| 45° | 1.4 |
So, if you need to clear a 4-inch obstruction with a 30° bend: 4 × 2 = 8 inches between bends.
Bending conduit is a blend of muscle memory and precision. Begin by marking your conduit based on the type of bend you need. Position it in the bender so the mark aligns with the arrow or star on the shoe (depending on the bend). Place your foot on the pedal, apply steady pressure, and bend until the desired angle is reached—checking with an angle finder or level as needed. If the bend falls short or goes too far, make small corrections by reversing or over-bending slightly.
Different bend types serve different practical needs on the job:
90° Bend (Stub-Up): The standard vertical bend used to route conduit up from a box or floor
Offset Bend: Two equal bends to navigate an obstacle or change elevation
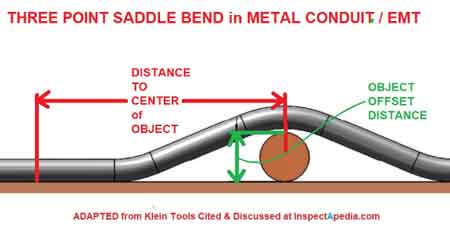
Saddle Bend: A three-point bend that goes up and over pipes or beams
Back-to-Back Bend: Two 90° bends in opposite directions to form a U- or Z-shape
Kick Bend: A single angled bend to slightly lift or lower the conduit at one end
Mastering these shapes expands your flexibility on the job site and ensures clean, functional installations.
This is the distance from the center of the curve to the inner edge of the pipe, is crucial for preventing kinks and maintaining structural integrity. This value is carefully calculated based on the pipe's size and type. Refer to the manufacturer's instructions or a bending chart for specific guidelines. For instance, a common radius for 1-inch EMT is 4 inches. By adhering to these guidelines, you ensure smooth, flowing curves that preserve the pipe's strength.
Stay informed with our FREE Wiring Devices Newsletter — get the latest news, breakthrough technologies, and expert insights, delivered straight to your inbox.
Even with the right tools and calculations, the pipe can be unforgiving. Kinks and flattening can weaken it, compromising the electrical system. Avoid these pitfalls by applying steady pressure throughout the process. Use the correct bender, and exercise restraint, remembering that overdoing can weaken the pipe. For longer bends, support the pipe to prevent sagging. With practice, you'll develop a feel for its limits.
To navigate obstacles and create functional wiring systems, electricians employ a variety of types. Offset bends shift the run horizontally or vertically. Saddle bends clear obstacles, maintaining proper spacing. Kick bends change the direction of the run at an angle. Back-to-back bends create Z-shaped offsets. Mastering these types empowers you to tackle complex installations with confidence.
In electrical work, safety is paramount. Working with conduit involves inherent risks that demand respect. Always wear safety glasses and gloves. De-energize circuits before working on any pipes. Be mindful of your surroundings. By adhering to safety protocols, you not only protect yourself but also demonstrate professionalism.
Shaping conduit is more than a mechanical process; it's a testament to the electrician's skill. By understanding the principles, mastering the techniques, and utilizing the right tools, you can elevate your expertise. Consult the manufacturer's instructions and adhere to all relevant electrical codes. With dedication and practice, you can transform ordinary pipes into functional works of art.
Explore 50+ live, expert-led electrical training courses –